Why
Your telescope is run by a small Linux computer, often a Raspberry Pi,
with indiserver exposing the mount and the camera on the network. That
works well for planning and imaging from a laptop. But out at the
telescope you mostly want small things: centre a star with a gentle
nudge, stop the mount now, take one test exposure, check that tracking
is on.
Unlocking a phone or carrying a laptop out for that is clumsy in the dark and the cold. This firmware gives you a dedicated device with real keys instead, one that does those few jobs well.
A laptop or phone at the telescope
A bright screen, a full desktop client and a touchscreen to tap with cold fingers, just to move the mount a little.
A Cardputer in your pocket
Hold an arrow key to nudge, press A to stop all
motion, press Space to expose. It talks to the same INDI server
directly.
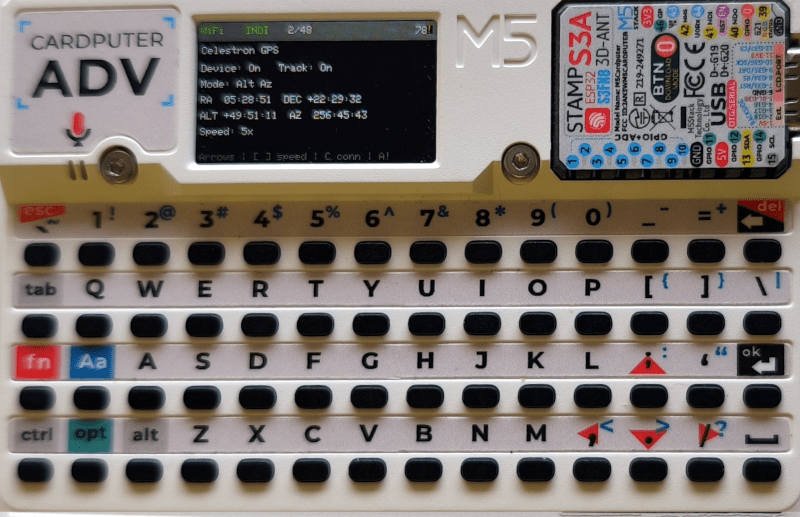
indi_celestron_gps driver.How it works
The Cardputer connects to your INDI server over Wi-Fi and speaks the INDI protocol itself, with no proxy in between. It discovers the devices the server offers and recognises mounts and cameras by the standard properties they expose, not by brand or model. Anything else is still there to look at in a read-only property inspector.
- ServeRun
indiserverwith your mount and camera drivers on a computer at the telescope. - ConnectOn the Cardputer, pick a Wi-Fi network and enter the server's address. It is tested, then saved.
- ControlChoose a device from the list and use its screen: nudge and abort for mounts, expose for cameras.
Made for the field
Motion you can trust
The mount moves only while you hold an arrow key and stops when you
let go. A aborts all motion, even from other screens while
the mount is selected.
Location and time from GPS
With the Cap LoRa868 GNSS module fitted, compare the mount's location and clock with live GPS data and send the fix with one key.
Not tied to one brand
Controls appear when the driver offers the standard properties for
them, such as TELESCOPE_MOTION_NS or
CCD_EXPOSURE.
Set up on the device
Wi-Fi and server settings are entered on the Cardputer and kept across restarts, but only after the connection test succeeds.
Recovers on its own
Lost Wi-Fi or a restarted INDI server? It reconnects by itself, so you can get back to observing.
Small by design
A streaming XML parser and a bounded property cache fit the ESP32-S3's memory. Image downloads are switched off.
What it supports today
Version 1.0 is a stable release, and the firmware has been under active development since then. It runs on one device: the M5Stack Cardputer ADV.
- Mounts: connection and tracking state, tracking mode and slew
speed, RA/Dec and Alt/Az when the driver reports them, hold-to-nudge
in four directions, slew rates chosen with
[and]or the number keys, and an emergency abort. - Mount sync from GNSS: latitude, longitude, UTC and, with a 3D fix,
elevation, sent to mounts with writable
GEOGRAPHIC_COORDandTIME_UTC. If anything required is missing, nothing is sent. - Cameras: choose an exposure time and start it through
CCD_EXPOSURE, and choose ISO when the driver offers a writable ISO switch. - Everything else: a read-only inspector for every device, property and value.
Vendor-specific DSLR actions, image previews and image downloads are not
supported. A driver advertising a property doesn’t guarantee the
hardware honours it. The firmware keeps a limited number of devices and
properties in memory; when a server sends more, a yellow ! warns that
some were left out.
Park and unpark, tracking control, a red night mode, focusers, filter wheels and camera gain are planned in the roadmap, with no promised dates.
Get started
You need a Cardputer ADV, a computer with PlatformIO to flash it, and an INDI server on the same network. The README shows a complete server setup for a Celestron NexStar mount on a Raspberry Pi.
1. Flash the firmware
Connect the Cardputer over USB and, from a clone of the repository:
git clone https://github.com/arturormk/cardputer-adv-indi-controller.git
cd cardputer-adv-indi-controller
# build and upload the cardputer-adv environment
./flash
Each tagged release
also carries a complete flashable image, indi-controller-<tag>.bin.
2. Start an INDI server
On the computer at the telescope, start indiserver with your drivers.
For a Celestron NexStar-compatible mount:
indiserver -v -p 7624 indi_celestron_gps
Choose the mount’s serial port (for example /dev/ttyUSB0) once from an
INDI client such as KStars/Ekos; the driver remembers it. Make sure TCP
port 7624 is not blocked by a firewall.
3. Configure and connect
On the Cardputer, press S in the device list. Pick your Wi-Fi network,
type its password, enter the server’s address and port 7624, then
select Test & save.
The device list fills in once it connects. The punctuation keys with
printed arrows (; . , /) move around; Enter opens a device and
Backspace goes back. On the mount screen, hold an arrow to nudge, use
[ and ] to change the slew rate, and press A to stop everything.
Learn more
- README: every key on every screen, the GNSS details, the NexStar server setup and the build and versioning scheme.
- Changelog: what changed since v1.0.
- Roadmap and design blueprint: where it is heading and why it is built the way it is.
- Issues: bug reports and drivers that don’t behave as expected.
Cardputer INDI Controller is MIT licensed.