Why
An Alt/Az GoTo mount such as a NexStar aligns best when its base is level, so you start every session by levelling the tripod. Then a small computer, often a Raspberry Pi, drives the mount, and its idea of where the telescope is pointing lives on a laptop or phone screen.
At the telescope you want both in front of you: how level the mount is, and what the computer is doing. And a script on the Pi would like to know the tilt too, which a spirit level can’t tell it.
A spirit level on the tripod
A bubble you read by eye, by torchlight. Nothing for the computer to check, and the time and coordinates are on another screen.
The clinometer on the mount
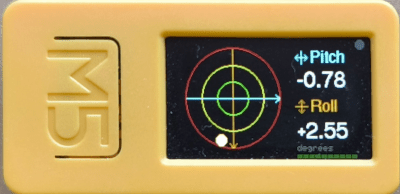
Pitch and roll in degrees, the time and the mount's coordinates on one small screen, all reachable over Bluetooth from the Pi.
How it works
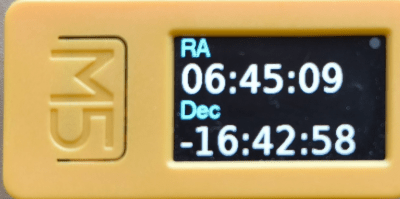
The firmware reads the device’s built-in accelerometer about 15 times a second and draws a bubble level. The front button cycles through the other screens: the time, the mount’s RA/Dec and Alt/Az, and the battery.
The device also runs a Bluetooth LE service with a plain-text protocol:
one short ASCII command in, one reply out. A computer nearby can ask for
the tilt, push new coordinates to the screen or show a message, whatever
screen is active. The repository includes m5ctl, a Python
command-line client that speaks this protocol for you.
- FlashPut the firmware on an M5StickC Plus 2, or build it for another supported M5Stack board.
- ConnectFind the device with
m5ctl scanand save its address once. - UseLevel the mount on the clinometer screen, then let your scripts set the clock, coordinates and messages.
Made for the telescope
Level that knows your mounting
Set the zero from any orientation with calibrate, and
choose which screen axis is pitch and which is roll, so the readings
make sense however the device is fixed to the mount.
Scriptable from the Pi
Ask for the tilt, or stream it, and update the RA/Dec and Alt/Az screens as the mount moves. Messages can wait for a button press and report it back.
Clock for the observer
Local time with any UTC offset and label, or local and Greenwich sidereal time computed from UTC and your longitude.
Easy on dark-adapted eyes
Night mode turns every colour red. The backlight dims itself when nothing is happening, and a long press of the front button steps through brightness levels.
Remembers your setup
UTC is kept in the hardware clock. The time zone, longitude,
calibration and axis choice are saved only when you send
persist, and come back on every boot.
Batch and timed scripts
m5ctl runs whole setup files over one connection, and
timed scripts that wait, loop, check replies or wait for a tilt.
What it supports today
The latest release is v1.4.0. The reference device is the M5StickC Plus 2, and each release carries a ready-to-flash firmware image for it. The same firmware builds from source for the M5StickS3, M5Stack Core2, CoreS3 and Grey; the screen layout adapts to their larger displays.
- Screens: clinometer, time, RA/Dec, Alt/Az, battery (with an optional charge-history graph) and four system-information pages, plus a full-screen message overlay with Unicode fonts.
- Bluetooth: a single GATT service with a text protocol. The README documents every command, reply and error.
- Tools:
m5ctlfor the command line, an interactive terminal and scripts; a live 3D orientation viewer; andbatplot, a chart viewer for the optional battery log.
The device shows the coordinates it is sent; it doesn’t talk to the mount
itself. Boards without a hardware clock, such as the Grey, forget the
time when powered off, so it has to be set again after each boot. On the
M5StickC Plus 2, an ENV III unit on the Grove port makes the battery
voltage read wrong because of an upstream library bug; the firmware shows
-- V instead. Wi-Fi is out of scope for now: everything goes
over Bluetooth LE.
Get started
You need an M5StickC Plus 2 and a USB cable, and a computer with
Bluetooth for m5ctl. To build for other boards, use
PlatformIO and the repository’s ./flash
script instead of step 1.
1. Flash the firmware
Download firmware-v1.4.0-m5stickc-plus2.bin from the
latest release.
The simplest way to flash it is the
ESP Web Flasher in Chrome or
Edge, at address 0x0000. From a terminal, esptool does the same:
pip install esptool
python -m esptool --chip esp32 --port /dev/ttyUSB0 \
    --baud 921600 write_flash 0x0000 \
    firmware-v1.4.0-m5stickc-plus2.bin
Reset the device and the clinometer screen appears.
2. Find the device
m5ctl uses uv for its dependencies. From
a clone of the repository:
git clone https://github.com/arturormk/m5stickc-ble-clinometer.git
cd m5stickc-ble-clinometer
uv sync
# look for M5-NexStar-Level and note its address
uv run tools/m5ctl scan
Save that address in .m5ctl.conf at the project root, and every
m5ctl command uses it from then on:
device.main = AA:BB:CC:DD:EE:FF
3. Level, set up and save
# Current pitch and roll in degrees
uv run tools/m5ctl tilt

# Set the clock and show local time with its zone label
uv run tools/m5ctl set-time-now

# Your longitude, for local sidereal time
uv run tools/m5ctl set-longitude -3.7

# Send coordinates to the RA/Dec screen
uv run tools/m5ctl set-radec 06:45:09 -16:42:58

# Keep zone, longitude and calibration across reboots
uv run tools/m5ctl persist
When you’re ready to explore, uv run tools/m5ctl terminal
opens an interactive session, and uv run tools/m5ctl run tools/demo.m5s
takes the device through all of its features.
Learn more
- README:
every screen, button and BLE command, the
m5ctlreference, other ways to flash and the test suite. - Changelog: what changed in each release.
- Know-how and the angle convention: lessons learned building it, and exactly how pitch and roll are defined on each board.
- Issues: bug reports and ideas.
M5 Bluetooth Clinometer is MIT licensed.